
![32 AI eCommerce Tools To Start Using Today [2024]](https://www.groovecommerce.com/hubfs/2023%20Website/Blogs/AI%20Blog%20Social%20Media%20Tools/7%20AI%20Tools%20For%20eCommerce%20Merchants%20To%20Start%20Using%20Today%20-%20Promo%20Image%20Large.jpeg)


Google announced last month that its Universal Analytics product is officially “out of beta and into primetime." With a slew of new features and functionalities, Universal Analytics has been touted as the next generation of Google Analytics, shifting from a session-based approach to a user-centric, cross-device approach for reporting.
What this means is that moving forward, the platform will tell you more about the actual people interacting with your website and provide greater insights into your overall omni-channel marketing performance.
![]()
Two new reports from Universal Analytics that we’ve been particularly excited about here at Groove are the Demographics and Interest reports, which show you not only how many visitors are engaging with your site over a specified date-range, but who these visitors are and how their behavior varies by attribute.
In this blog, I’ll walk you through the steps needed to get Demographics and Interest reports in place within your own Universal Analytics account.
Step #1: Update Your Analytics Tracking Code to Support Display Advertising
This first step is needed because these reports are pulling the exact same demographics and interest data that you would use to target ads on the Google Display Network with Google’s DoubleClick third-party cookie technology. Now, you have the ability to simply repurpose this data for Analytics reports.
To update your tracking code, you’ll just need to add a single line of code to your current tracking code which you can find within your Analytics dashboard by navigating to Admin>Property>Tracking info. If you scroll to the bottom of this page, you’ll see your code within a text box.
Now, you’ll want to insert the blue line of code below in-between your last 2 lines before the </script> tag:
ga('create', 'UA-XXXXXXX-XX', ‘yourURL.com');
ga('require', 'displayfeatures');
ga('send', 'pageview');
The resulting code should look similar to:
<script>
(function(i,s,o,g,r,a,m){i['GoogleAnalyticsObject']=r;i[r]=i[r]||function(){
(i[r].q=i[r].q||[]).push(arguments)},i[r].l=1*new Date();a=s.createElement(o),
m=s.getElementsByTagName(o)[0];a.async=1;a.src=g;m.parentNode.insertBefore(a,m)
})(window,document,'script','//www.google-analytics.com/analytics.js','ga');
ga('create', 'UA-XXXXXX-XX', 'yourURL.com’);
ga('require', 'displayfeatures');
ga('send', 'pageview');
</script>
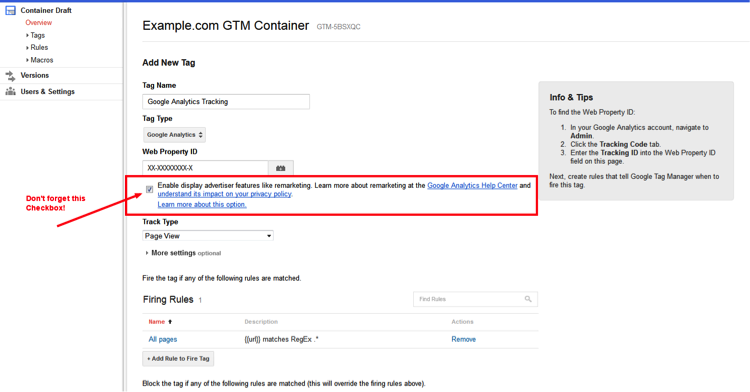
If you're using Google Tag Manager, you’ll also need to select the “Enable display advertiser features like remarketing option” within the Web Property ID section of your Analytics admin dashboard as shown below:
Once you have modified your Analytics tracking code by adding ga('require', 'displayfeatures'), you’ll need to update all of your website pages and resubmit your sitemap to Google so that it gets crawled. An easy way to do this manually is through Google Webmaster. Just follow these quick steps and you’ll be set:
- Log into Google Webmaster and select your website
- Select “Crawl” on the left side navigation and then “Fetch as Google”
- Make sure that your homepage URL is displayed and then click the red “FETCH” button
- Once successfully fetched, select “Submit to Index” and then “Crawl this URL and its direct links” as shown below:

This crawl should take 1-2 days, after which you’ll have the ability to see the demographics and interest data within your Analytics account, assuming you’ve enabled these reports (more details below) and there weren’t any issues with your tracking code.
Step #2: Update Your Website's Privacy Policy
Google requires anyone using their Display Advertising code to inform all website visitors that you’re doing so. An easy way to do this is by simply updating your privacy policy based on the following guidelines (as quoted directly from Google):
- The Google Analytics features you've implemented based on Display Advertising (e.g., Remarketing, Google Display Network Impression Reporting, the DoubleClick Campaign Manager integration, or Google Analytics Demographics and Interest Reporting).
- Using the Ads Settings, users can opt-out of Google Analytics for Display Advertising and customize Google Display Network ads.
Make sure that your privacy policy is in a location that’s easy to find such as a link in your global footer.
Step #3: Enable Demographics & Interest Reports in the Analtyics Interface (Edit Permission Required)
The easiest way to enable these reports is right within your Admin configuration, though you'll need Edit permission for your user account to do so. Simply navigate to your account, then select Admin > [Your Website Property]> Property Settings. Then, under Display Advertiser Features, enable the reports by sliding over the “ON” button as shown below:

Once complete and, again, assuming that there weren’t any issues with your tracking code, it should take another ~24 hours for your demographics and interest data to fully propagate.
Conclusion
If you've made it through all of the steps outlined above and now have Demographics and Interest reports properly displaying within your Universal Analytics account, it's time to get pumped.

We’ll be diving into some of our own suggested ideas and campaigns for these reports in a later blog post, so stay tuned if you need some inspiration.
Having issues getting these reports activated on your own website? Or, need help making the transition to Universal Analytics? Don’t hesitate to drop us a message below and we’d be happy to talk!