Developers are always working towards a more semantic web. Isn’t part of the appeal of the web being able to send and share information? Thankfully, we have people way smarter than myself figuring out new ways to quickly and accurately share data across multiple platforms that speak different languages without issue. Schema.org tags are one way to do exactly that; help us describe our page content through structured microdata.
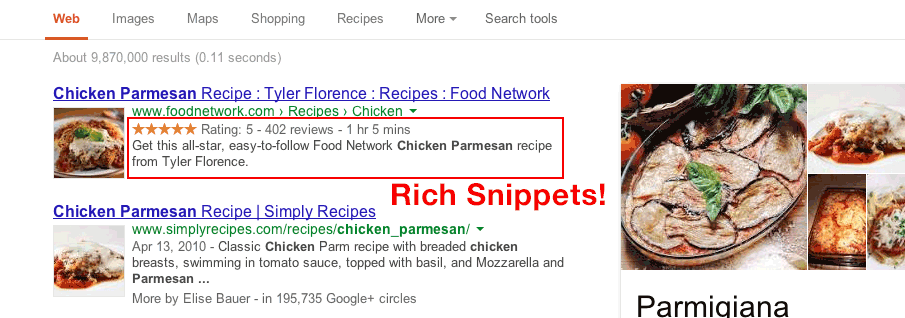
By giving search engines spiders as much information as we can about our page, site indexing is more accurate and produces better results. The best part about adding microdata to your Magento product pages is the fact that they enable rich snippets on the search engine results pages. Rich snippets are content originally missing from a regular SERP result, such as star rating, review count, price, and availability that shows up between the page title and description on search results. These not only give users a snapshot of your product, but they can even increase click-through rates by 20-30%!
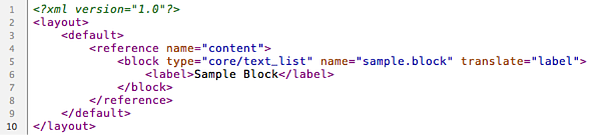
Microdata, Microformats, RDFa and rich snippets oh my!
Rich snippets can also be implemented using different technologies such as microformats and RDFa. Each of these technologies has their own pros and cons. However, microdata using Schema.org tags are not only endorsed and recommended by the big three search engines, but conveniently fall in the middle in terms of complexity and features (RDFa being the most complex and feature rich).
Adding Schema.org Microdata to Simple Products
For any of this to work, you need to set up Schema.org tags on a simple product page. The minimum recommended information to include is name, price, and availability. It is also important to include the review information to show the star rating. We'll be using the Product, Offer, and AggregateRating schemas for this task.
Warning: Remember to never edit core files! Make sure to copy these phtml files into the correct directory in your package/theme
We will be editing these files:
app/design/frontend/[package]/[theme]/template/catalog/product/view.phtml
app/design/frontend/[package]/[theme]/template/catalog/product/view/media.phtml
app/design/frontend/[package]/[theme]/template/catalog/product/view/type/default.phtml
app/design/frontend/[package]/[theme]/template/catalog/product/price.phtml
app/design/frontend/[package]/[theme]/template/review/helper/summary.phtml
* NOTE: When adding data remember to use Meta tags for information that is different (IE: currency) and for all enumerated information use the link tag.
Setting Up a Product Item Scope
app/design/frontend/[package]/[theme]/template/catalog/product/view.phtml
Start with declaring an itemscope of a product on line 41.
<div class="product-view" itemscope itemtype="http://schema.org/Product" itemid="#product_base">
If you’re only configuring simple products, you can ignore the itemid; this sets up a link between the parent Product schema and the children product offers. This id can be whatever you want, since this is static information for references and not itself being indexed.
Tag the product name on Line 50
<h1 itemprop="name"><?php echo $_helper->productAttribute($_product,$_product->getName(), 'name') ?></h1>
Product Short description on Line 81
<div class="std" itemprop="description"><?php echo $_helper->productAttribute($_product, nl2br($_product->getShortDescription()), 'short_description') ?></div>
We can also use Meta tags to include any other information we want about the base product inside of the product scope. These are just two examples.
<meta itemprop="url" content="<?php echo $_product->getUrlModel()->getUrl($_product, array('_ignore_category'=>true)); ?>" />
                <meta itemprop="sku" content="<?php echo $_product->getSku() ?>" />
Adding the Product Image Property
app/design/frontend/[package]/[theme]/template/catalog/product/view/media.phtml
You’ll need to make the change to declare the product image in two places, Line 40 and Line 62.
$_img = '<img itemprop="image" id="image" src="'.$this->helper('catalog/image')->init($_product, 'image').'" alt="'.$this->escapeHtml($this->getImageLabel()).'" title="'.$this->escapeHtml($this->getImageLabel()).'" />';
                $_img = '<img itemprop="image" src="'.$this->helper('catalog/image')->init($_product, 'image').'" alt="'.$this->escapeHtml($this->getImageLabel()).'" title="'.$this->escapeHtml($this->getImageLabel()).'" />';
Setting Up Default Product Offers Scope
app/design/frontend/[package/[theme]/template/catalog/product/view/type/default.phtml
Now that we have set up a basic product scope, let’s set up a simple Offer, which includes Price and Availability. We do this to keep the offers scope separate depending on the different product types.
Open up default.phtml and wrap everything in an Offer Itemscope starting on Line 28.
<div itemprop="offers" itemscope itemtype="http://schema.org/Offer">...</div>
Then we can add a Meta tag for the product currency on Line 30…
<meta itemprop="priceCurrency" content="<?php echo Mage::app()->getStore()->getCurrentCurrencyCode();?>" />
and links for the ItemAvailablity on Lines 34 and 36.
<?php if ($_product->isAvailable()): ?>
                <p class="availability in-stock"><link itemprop="availability" href="http://schema.org/InStock"><?php echo $this->__('Availability:') ?> <span><?php echo $this->__('In stock') ?></span></p>
                <?php else: ?>
                <p class="availability out-of-stock"><link itemprop="availability" href="http://schema.org/OutOfStock"><?php echo $this->__('Availability:') ?> <span><?php echo $this->__('Out of stock') ?></span></p>
                <?php endif; ?>
Adding Product Price
app/design/frontend/[package]/[theme]/template/catalog/product/price.phtml
Price, however, is a trickier implementation. You will have to dive into the complex price template file, which while powerful can appear overwhelming. Since we only want to show the basic non-sale price right now there are two cases to look for:
<span itemprop="price" class="price" id="price-excluding-tax-<?php echo $_id ?><?php echo $this->getIdSuffix() ?>">...</span>
                <span class="regular-price" id="product-price-<?php echo $_id ?><?php echo $this->getIdSuffix() ?>">
                <?php echo str_replace('class="price"', 'class="price" itemprop="price"', $_coreHelper->currency($_price + $_weeeTaxAmount, true, true)); ?>
The second snippet of code allows us to target the price inside the $_price variable without having to worry about the price with tax. Thanks to byte.nl (now Hypernode) for this trick.
Adding the final bit, Aggregate Rating Scope Information
app/design/frontend/[package]/[theme]/template/review/helper/summary.phtml
The final piece to adding schema tags to a product is to include the AggregateRating information to show the basic star rating in your rich snippets. This data cannot be hidden; we’re going to update the ratings summary phtml file. If you want to create a custom phtml for this you can do that too.
Wrap this code block in an AggregateRating scope and add the required schema information for best rating, worse rating, rating value, and the review count. Starting around Line 27…
<span itemprop="aggregateRating" itemscope itemtype="http://schema.org/AggregateRating">
                <?php if ($this->getReviewsCount()): ?>
                <meta itemprop="ratingValue" content="<?php echo $this->getRatingSummary(); ?>"/>
                <meta itemprop="reviewCount" content="<?php echo $this->getReviewsCount(); ?>" />
                <meta itemprop="bestRating" content="100"/>
                <meta itemprop="worstRating" content="0"/>
                ….
                </span>
Now, lets move on to tackling the grouped products.
Setting up Grouped Product Offers!
app/design/frontend/[package]/default/template/catalog/product/view/type/grouped.phtml
Since we have the base for our Product schema, adding the grouped product offers isn’t that much more work. We’ll need to open up the grouped.phtml template and make a few changes.
Starting on Line 38, we have to add availability of the main product scope.
<?php if ($_product->isAvailable() && $_hasAssociatedProducts): ?>
                <p class="availability in-stock"><link itemprop="availability" href="http://schema.org/InStock"><?php echo $this->__('Availability:') ?> <span><?php echo $this->__('In stock') ?></span></p>
                <?php else: ?>
                <p class="availability out-of-stock"><link itemprop="availability" href="http://schema.org/OutOfStock"><?php echo $this->__('Availability:') ?> <span><?php echo $this->__('Out of stock') ?></span></p>
                <?php endif; ?>
Then, we traverse down to our grouped product loop. This is where we have to instantiate a new offer, then inside of that offer we create another product scope and link it to our main product (the itemid we pointed out earlier). This is what links the product as a sub-product and gets us that pretty price range in our rich snippet. Remember to close all the tags!
Start the new scopes Line 64 and 65:
<tr itemprop="offers" itemscope itemtype="http://schema.org/Offer">
                <span itemscope itemtype="http://schema.org/Product" itemref="#product_base">
                <td itemprop="name"><?php echo $this->htmlEscape($_item->getName()) ?></td>
The new offers on Line 69 and 70:
<td class="a-right">
                <meta itemprop="price" content="<?php echo number_format($_item->getPrice(), 2);?>" />
                <meta itemprop="priceCurrency" content="<?php echo Mage::app()->getStore()->getCurrentCurrencyCode();?>" />
And lastly, add product availability on Lines 78-85:
<?php if ($_item->isSaleable()) : ?>
                <link itemprop="availability" href="http://schema.org/InStock">
                <input type="text" name="super_group[<?php echo $_item->getId() ?>]" maxlength="12" value="<?php echo $_item->getQty()*1 ?>" title="<?php echo $this->__('Qty') ?>" class="input-text qty" />
                <?php else: ?>
                <link itemprop="availability" href="http://schema.org/OutOfStock">
                <p class="availability out-of-stock"><span><?php echo $this->__('Out of stock') ?></span></p>
                <?php endif; ?>
                </td>
                <?php endif; ?>
Remember, because we’re making a new product offer we have to include the Name, Price, Availability, and Currency all over again.
Don’t Forget to Test!
As always, we need to test our tags to make sure that Google, Bing, Yahoo and other search engines are displaying these rich snippets properly. I would recommend periodic testing throughout the implementation process as to catch issues early. You can utilize the free testing tools that Google and Bing provide.
This is just the tip of the iceberg when it comes to structured data and all it offers. Interested in seeing what we can do for you? Contact Groove Commerce for a FREE Inbound Marketing Assessment to really learn how to drive sales and earn more!